The stack is a fundamental part of how computers manage function calls, variables, and execution flow, it’s crucial to understand how the stack operates, especially when exploring vulnerabilities like stack overflow or buffer overflow attacks, in this blog article, we’ll first delve into how the stack works before touching on how it can be exploited.
What is a Stack?
The stack is a section of memory in a computer’s architecture that operates on the principle of LIFO (Last In, First Out ). It is used to store:
- Function calls and their return addresses.
- Local variables.
- Temporary data during program execution.
The stack grows downward in memory, starting at a high address and moving to lower addresses as new data is added.
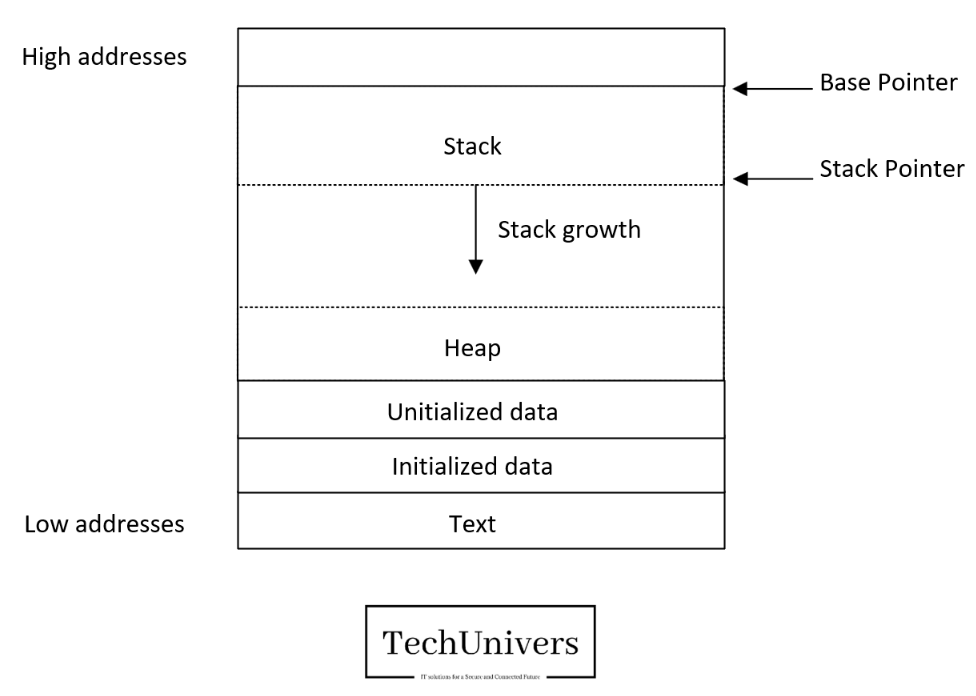
Stack frame
This LIFO structure is extremely useful. When a function is called, all the data necessary for the function’s execution, as well as for returning to the initial state, are pushed onto the stack. Once the function is complete, the program must return to the line following the function call, and this is done by popping everything that was previously pushed onto the stack, leaving the rest of the stack and any other stack frames intact, below a diagram that attempts to summarize my explanation: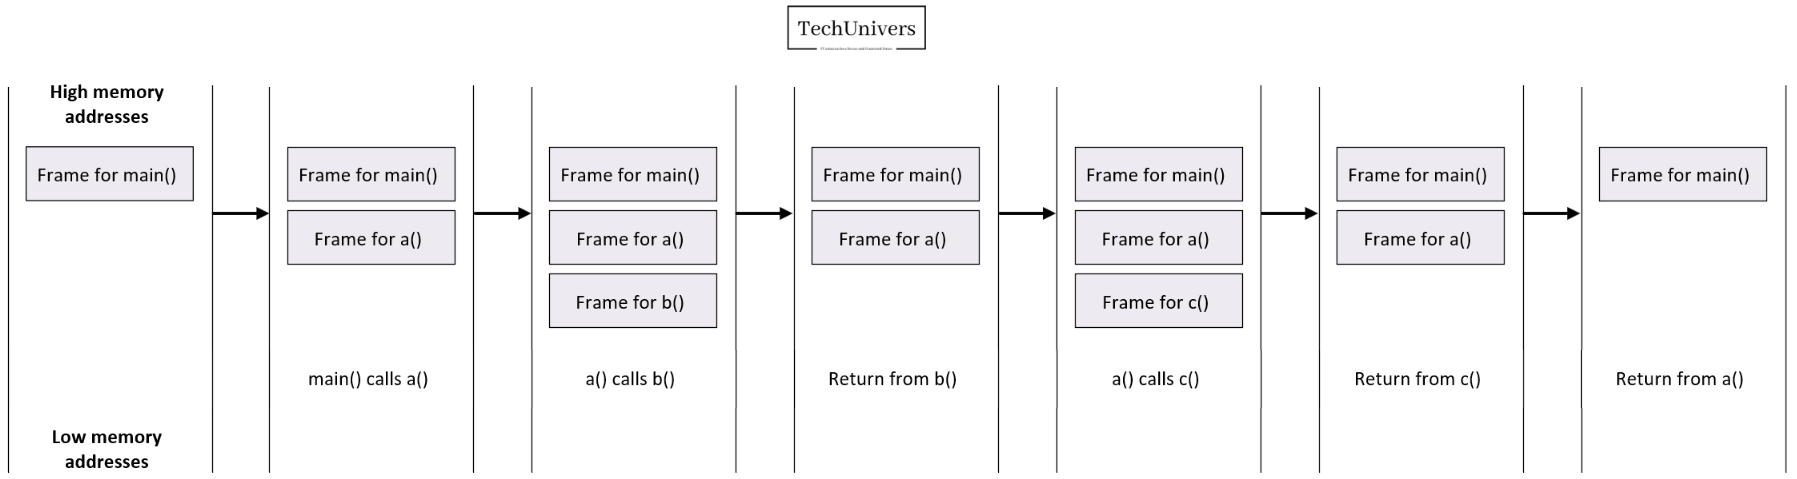
Base and stack pointers
The ESP (Extended Stack Pointer) and RSP (Register Stack Pointer) serve the same purpose in different architectures: ESP is used in 32-bit systems, while RSP is used in 64-bit systems. They point to the top of the stack and are updated automatically as the stack grows or shrinks.
The EBP (Extended Base Pointer) and RBP (Register Base Pointer) also share a similar distinction: EBP is used in 32-bit systems, and RBP in 64-bit systems. These registers store the base address of the current stack frame, making it easier to access function parameters and local variables. Unlike ESP/RSP, they are typically set manually by the program or compiler.
What we’ve just seen holds true as long as we stay within the same stack frame. However, what happens when a new function is called? Once this new function is finished, how does the processor return to the previous state? That’s what we’ll explore next.
Stack on motion
To fully understand the rest of this article, basic knowledge of assembly language is helpful, let’s consider the following C program.
Disassembling the main function
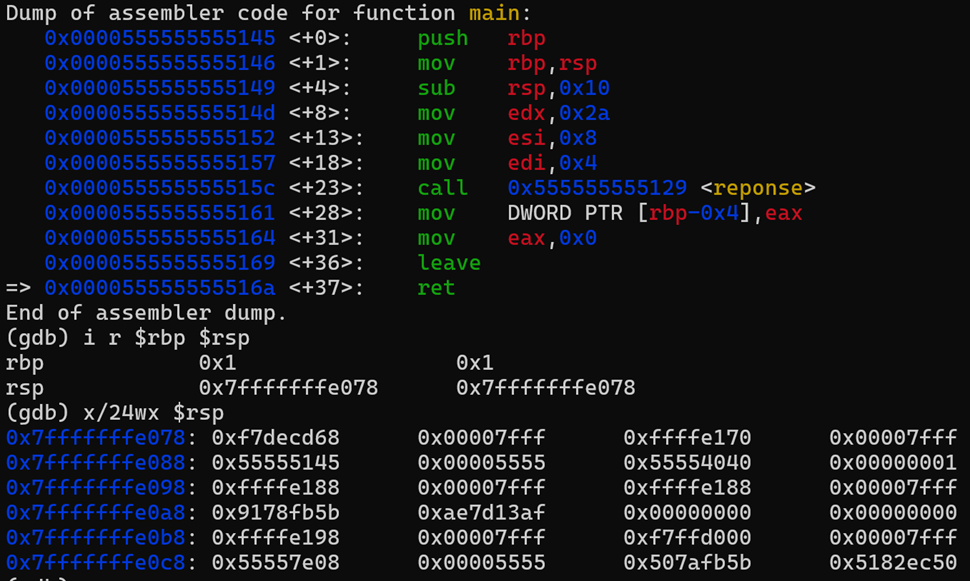
After compilation, we disassemble the main function to view the assembly instructions it consists of.

Let’s quickly review the purpose of the commands we’ve used:
- gcc (GNU Compiler Collection) command is a Linux command that was originally used to compile programs written in C. However, it has since evolved to support the compilation of programs in various languages (C, C++, Java, etc.), so now we have a binary called “fonction.binary” ready to be executed.
- gdb (GNU Project Debugger) is a powerful, fully command-line debugger. Among other features, it allows you to disassemble a program, run it, pause it during execution, read memory, modify memory during execution, and much more.
Tip: While in a gdb session, you can use a wide range of commands, since some of these commands can have very long names or may be used very frequently, abbreviations are available, for example, the command to view information about registers is “info registers”, but it can also be executed using the shorter command i r, for example to disassemble a function from a program loaded into gdb, we use the command disassemble function, here, we want to disassemble the main function, so we run the command disas main, note that disas is an alias for disassemble, as we just explained.
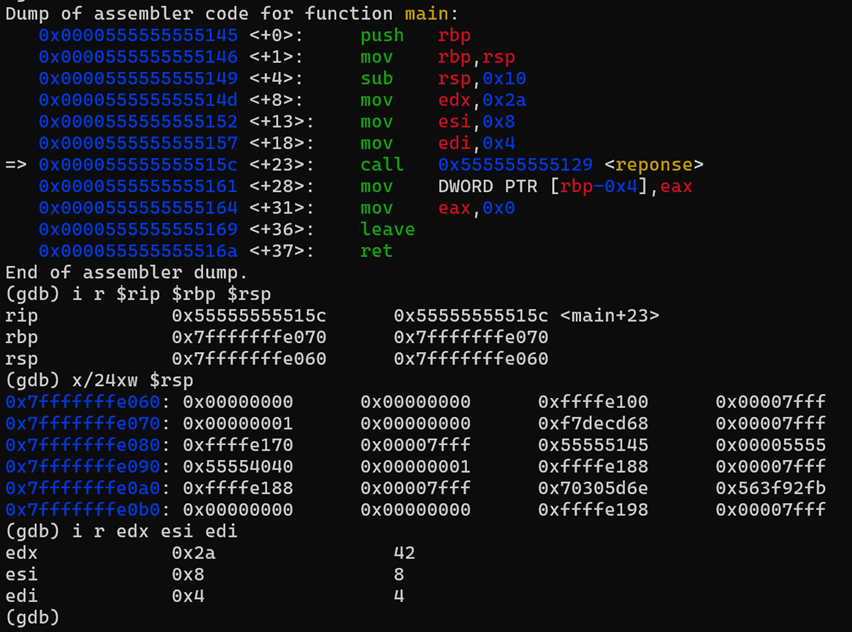
We notice several things now, first, we see the call to the function reponse at line +23 (address 0x000055555555515c) with the call instruction, then, we observe the three preceding lines, which involve pushing the arguments onto some registers that will be stored later in the stack to perform the compute operations.
Execution of the program step by step
We will use breakpoints to pause the execution at multiple points, allowing us to check the stack status and analyze the program’s behavior
Breakpoint 1:
Initialization of the main function.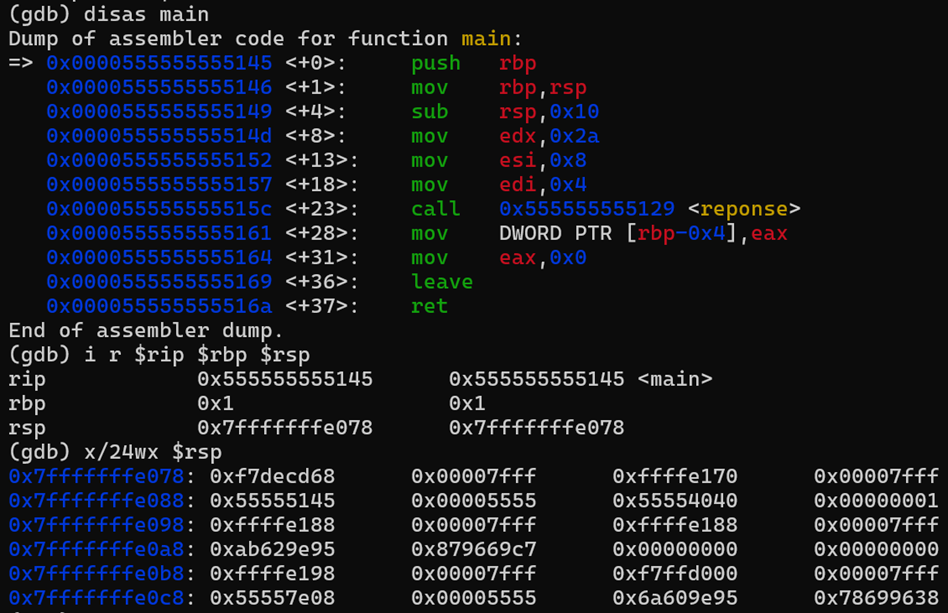
Breakpoint 2:
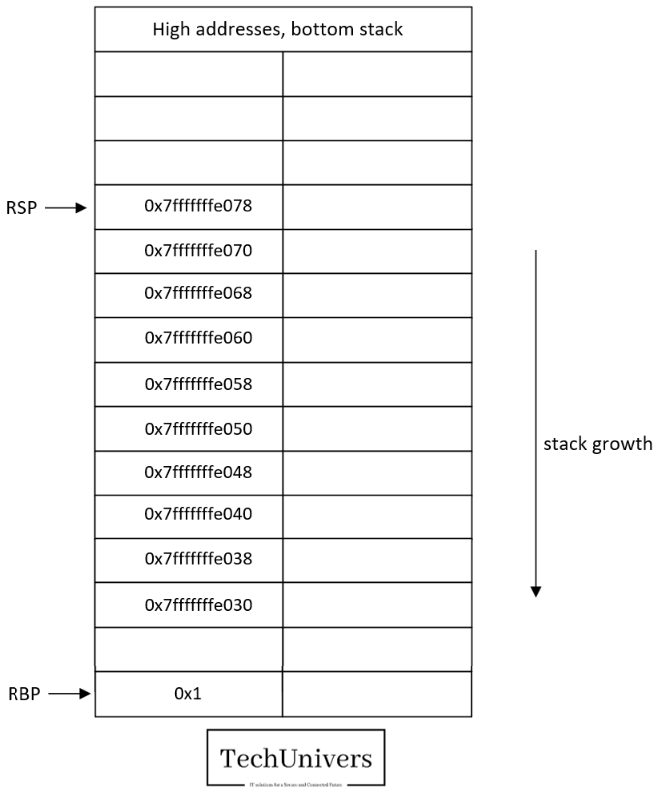
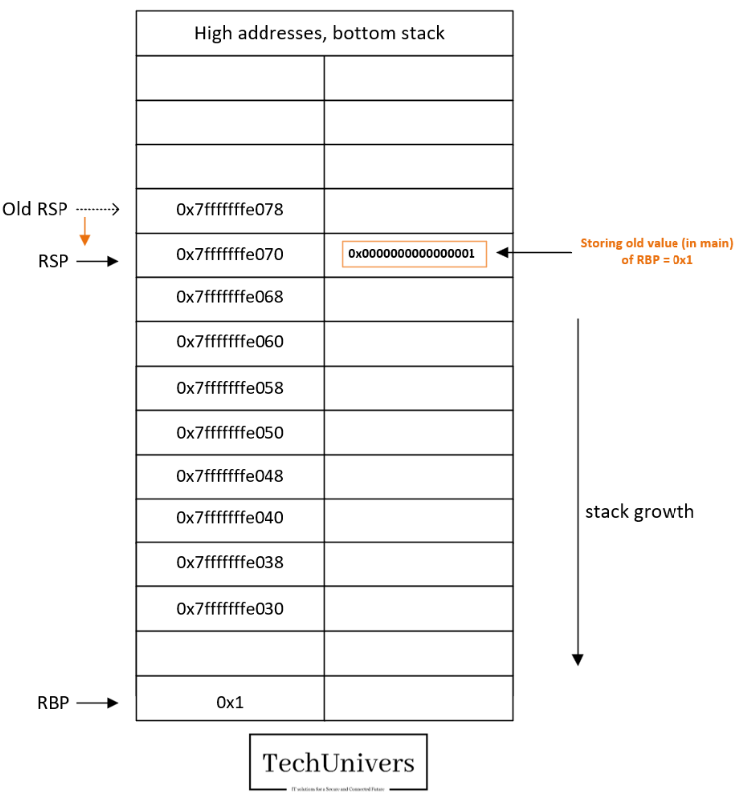
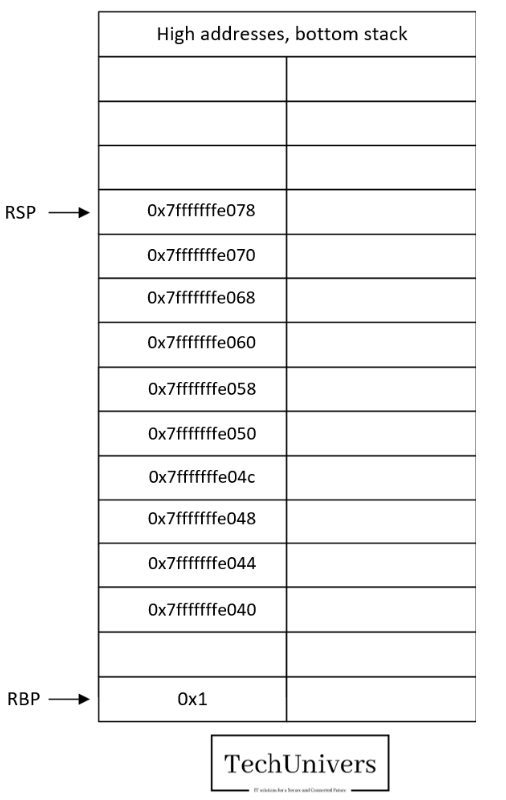
At this point, we executed the first instruction stored at the address 0x0000555555555145, and performed the following actions:
- Save the RBP pointer value on the stack.
- The head of the stack (RSP pointer) moved from the address 0x7fffffffe078 to address 0x7fffffffe070.
- 8 additional bytes = the size of the RBP register that will be saved in the address 0x7fffffffe070.
- The head of the stack (RSP pointer) moved from the address 0x7fffffffe078 to address 0x7fffffffe070.

Breakpoint 3:
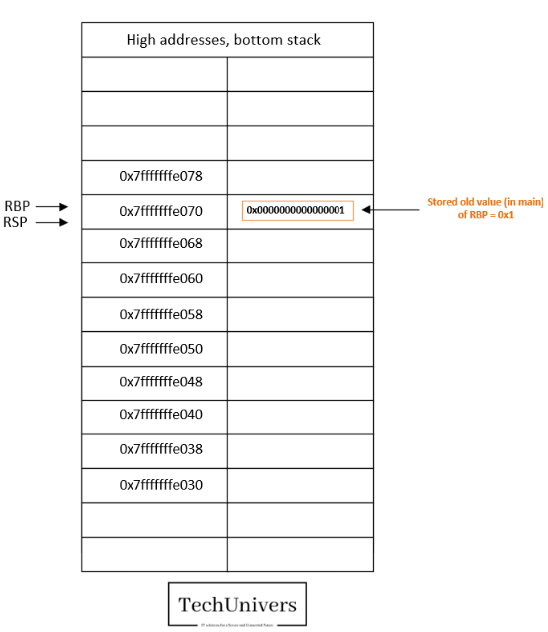
At this point we have performed the following actions.
- Save the value of the stack pointer (RSP) into the base pointer (RBP).
- Hence, RBP=RSP=0x7fffffffe070.
The goal is to use this new RBP as a reference to address the local variables for main. (for example, to store the EAX value that will be returned by the function “response” once called).

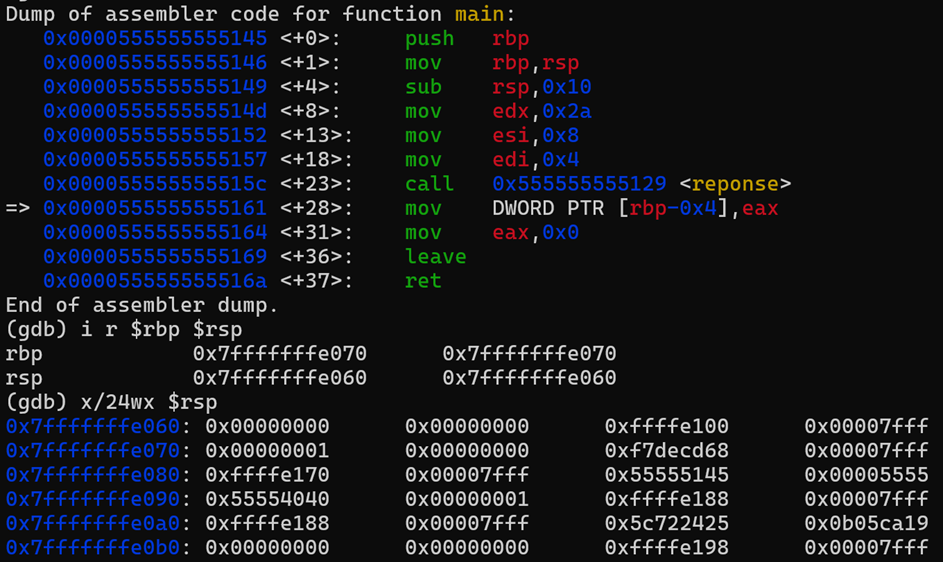
Breakpoint 4:
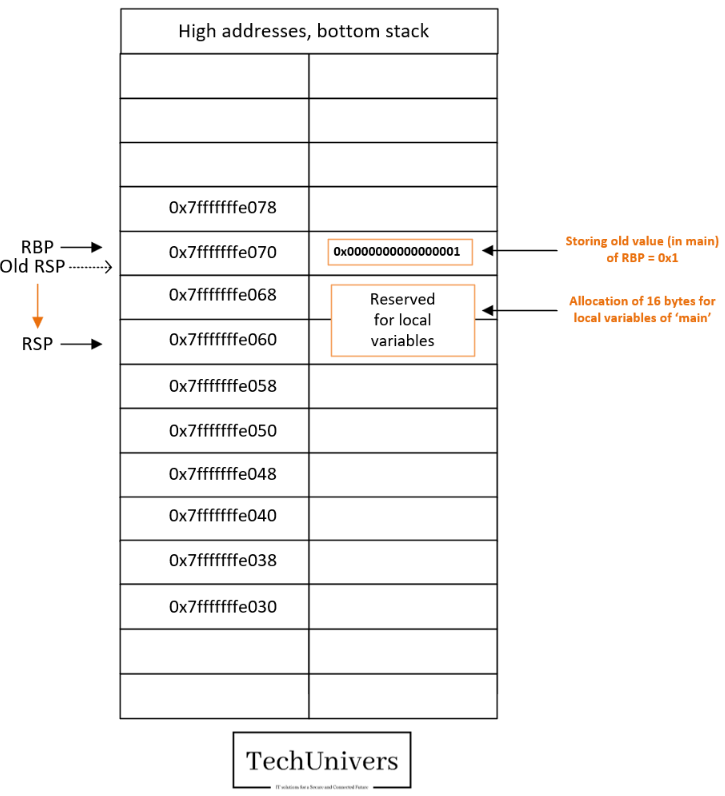
At this point we have performed the following actions.
- We reserved 16 bytes (0x10) for local variables by adjusting the stack pointer (RSP) downward by 0x10.
- So now the RSP=0x7fffffffe060.
- We have reserved 16 bytes for the local variables to main.
- We have saved the value of the params provided by main to “reponse” (4, 6, 42) into the general-purpose registers EDX, ESI, EDI.
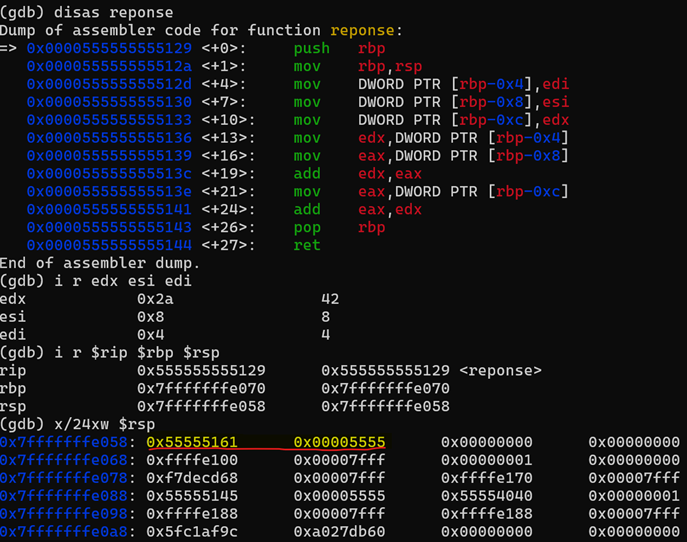
Breakpoint 5:
At this point we have performed the following actions.
- Calling the “reponse” function from main.
- The call instruction includes on it a push instruction, so we pushed into the stack the return address that contains the instruction to be executed once the function is executed.
- In this case the return address stored is 0x0000555555555161
- The head of the stack (RSP) moved from 0x7fffffffe060 to 0x7fffffffe058, so we could store the return address on to the stack.
- The call instruction includes on it a push instruction, so we pushed into the stack the return address that contains the instruction to be executed once the function is executed.
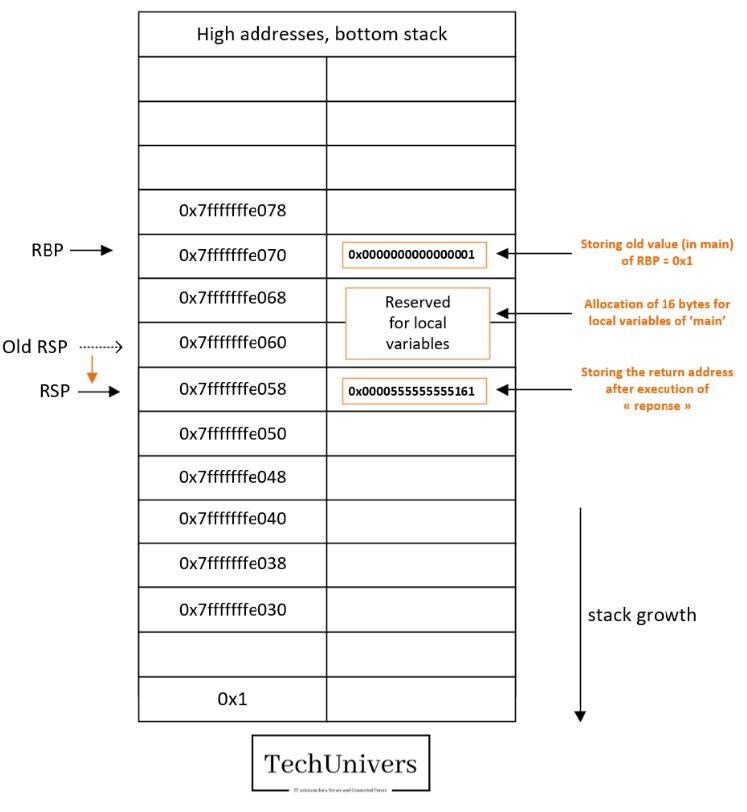
Breakpoint 6:
At this point we have performed the following actions.
- Save the initial value of RBP (0x7fffffffe070) in the stack.
- The RSP value will decrease by 8 bytes 0x7fffffffe058 è 0x7fffffffe050 as we did push RBP into the stack.
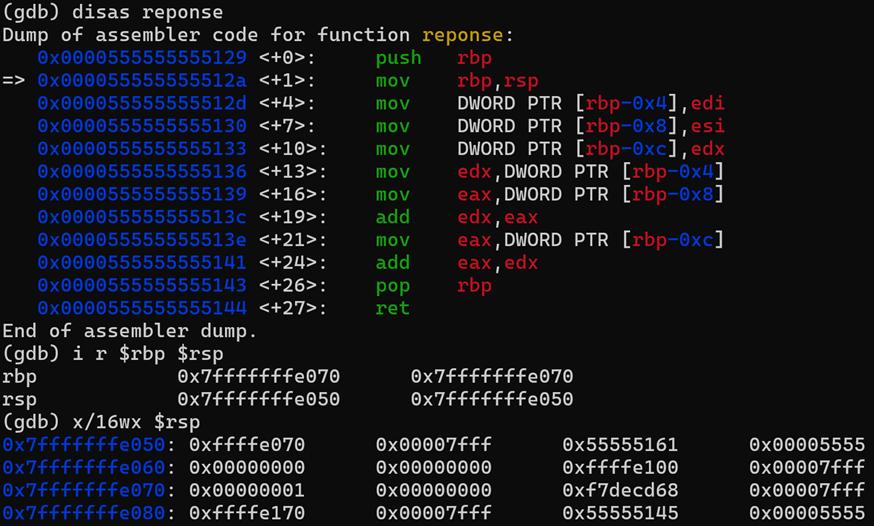
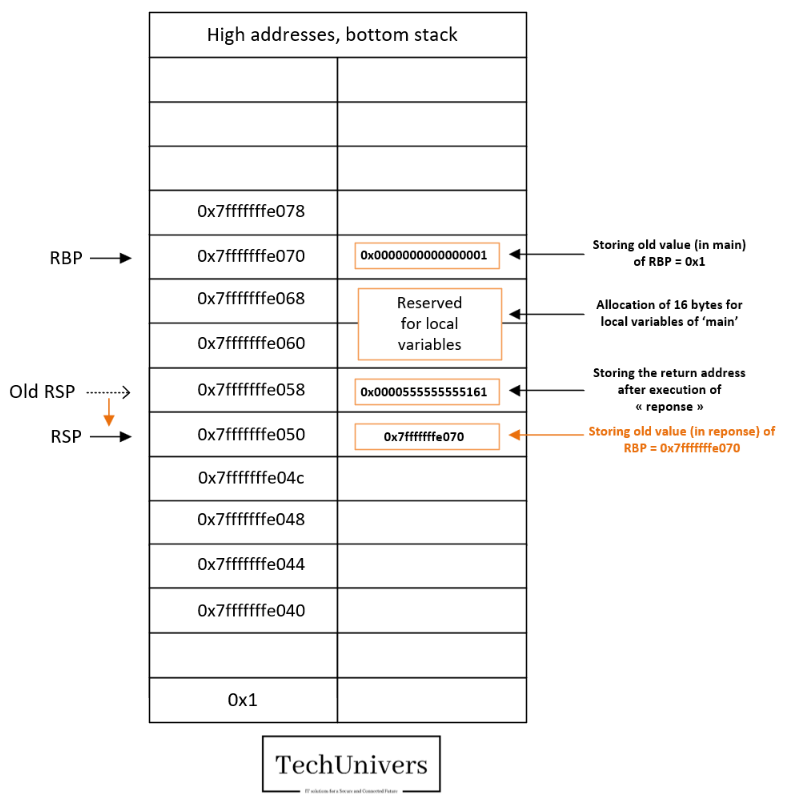
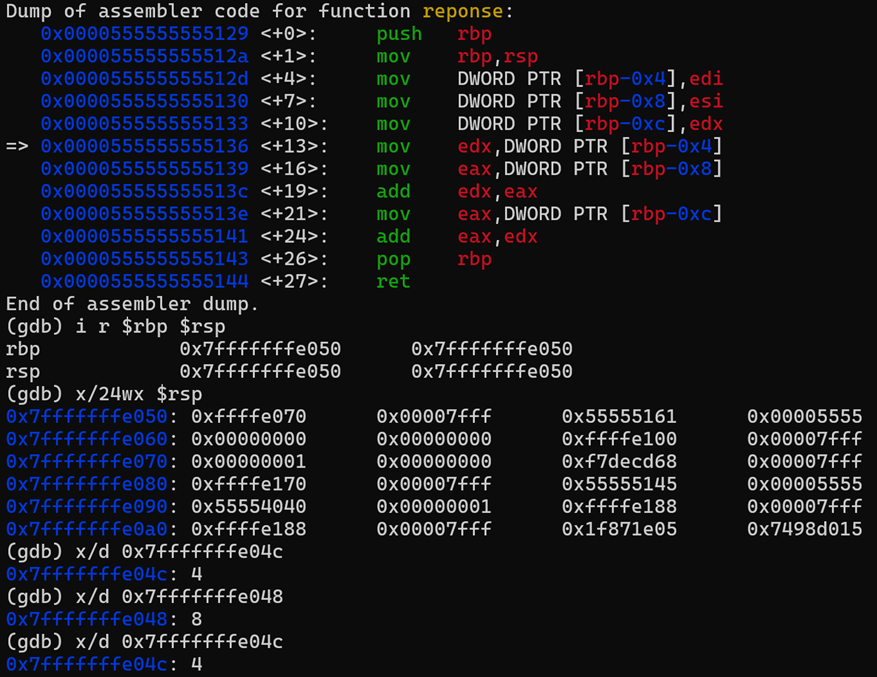
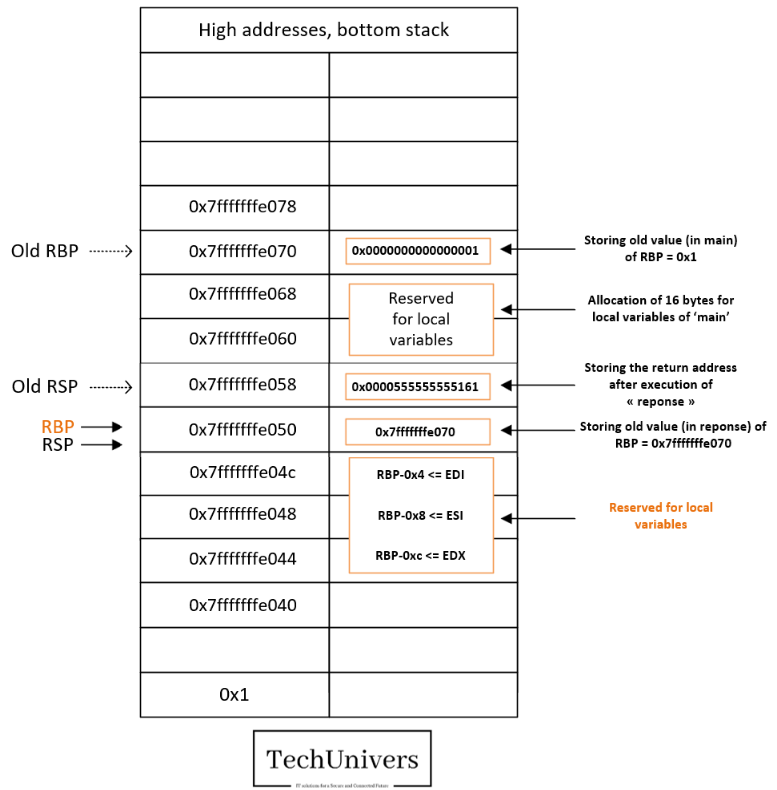
Breakpoint 7:
At this point we have performed the following actions.
- Set the RBP to match the new value of RSP (0x7fffffffe050).
- The compute section includes storing the variables passed to the function “reponse” into the stack frame reserved for “reponse”.
- Note that RBP: 0x7fffffffe050
- RBP-0x4= 0x7fffffffe04c, this address will store the value of the register EDI
- RBP-0x8= 0x7fffffffe048, this address will store the value of the register ESI
- RBP-0xc= 0x7fffffffe044, this address will store the value of the register EDX
Breakpoint 8:
At this point we have performed the following actions.
- The value to return is stored in the EAX register.
- The RBP value saved earlier in the stack is restored into the RBP pointer.
- The RSP value is decreased as well after popping the variables and RBP from the stack.
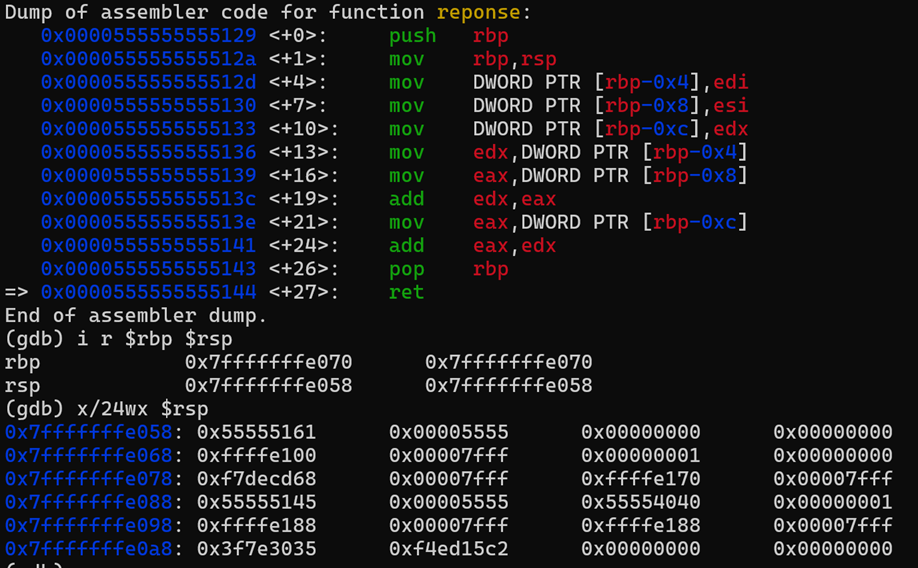
Breakpoint 9:
At this point we have performed the following actions.
- The stored value of the return address is popped from the stack after being saved into the register RIP as you can see below.
- The RSP pointer is decreased accordingly.
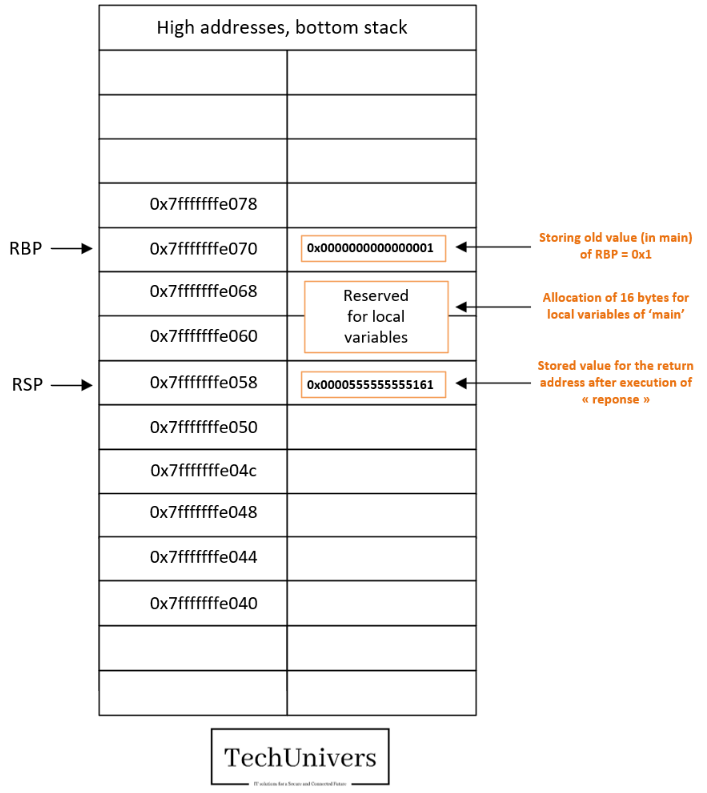
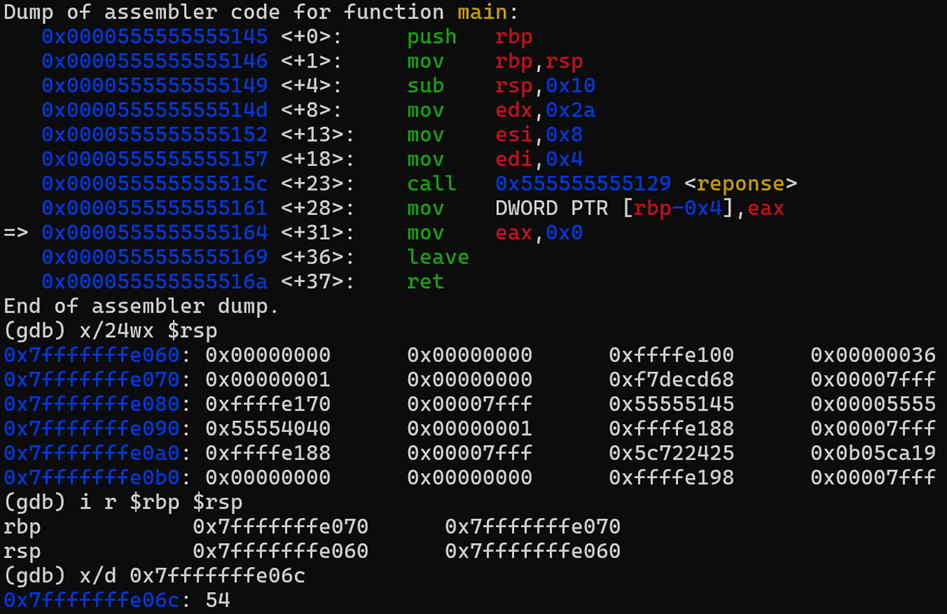
Breakpoint 10:
At this point we have performed the following actions.
- We saved the return value from the called “reponse” function into the main function buffer.
Breakpoint 11:
At this point we have performed the following actions.
- The RBP value stored in the stack for the main function is loaded into the RBP pointer and ‘cleared’ from the stack.
- The local variables ‘cleared as well’ and RSP moved accordingly to the initialization value.
Let’s recap
We can resume this execution flow as below
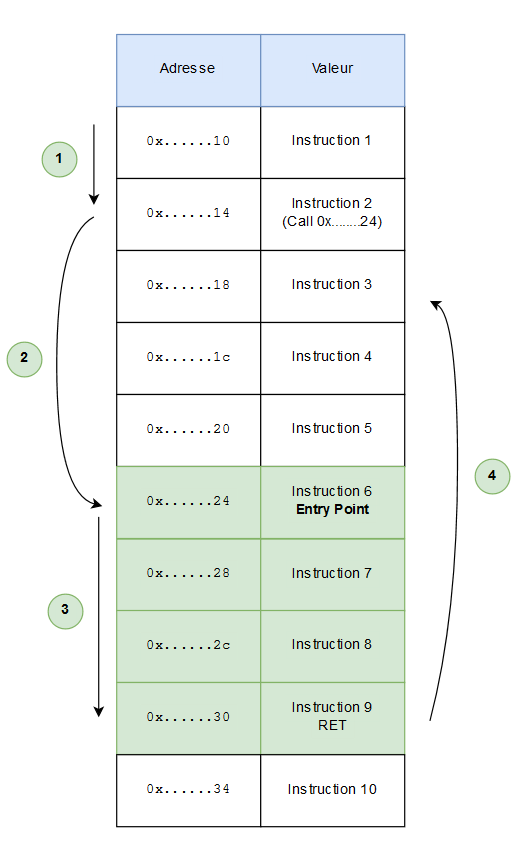
The program is read instruction by instruction (1). During a call (2), the current instruction (RIP) is pushed onto the stack, and then the program jumps to the address specified by the call. Here, the instructions of the function are executed one after the other until the RET (3), which retrieves the RIP value that was previously saved, allowing the program to return to where it left off (4), without losing its place!
Magic, isn’t it?
With this more detailed understanding, you are now ready to grasp the concept of a buffer overflow.


[…] A basic understanding of assembly concepts, shellcode, and how the stack works is recommended to fully grasp the topic. For more details on stack mechanics, you can refer to my previous article here. […]